I have some Virtualbox virtual machine on my desktop. Now I have Proxmox VE 5.3-8 installed on a separate machine. So I would like to move the VM to Proxmox.
Let me list the existing installation.
- My Desktop, Windows 10 Pro version 1809.
- Virtualbox 6.0.4 r128413
- Guest VM inside of Virtualbox is Ubuntu 18.04 with 1G memory and 20GB disk space.
- Proxmox VE 5.3-8, VM and LXC are stored in the local-lvm
Step 1, Located the vdi file and convert it to RAW format
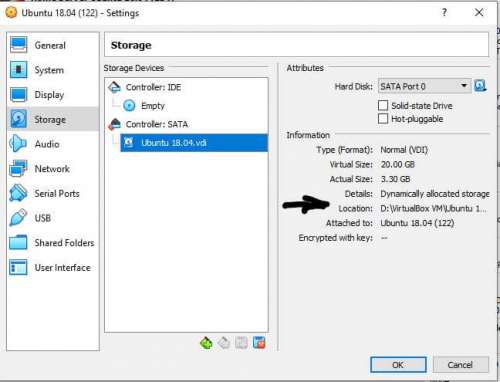
Check the settings of the virtual machine, storage, and located the location of the vdi file. Mine is in the d:\Virtualbox VM\
Then open a command prompt window, enter the following command to convert the vdi file to raw image file.
d:
cd "program files\oracle\virtualbox"
vboxmanage clonehd --format RAW "d"\virtualbox vm\ubuntu 18.04 (122)\ubuntu 18.04.vdi" d:\testing.img
After a while the new image file is ready. The time depends on the size of your VM. Maybe 10 minutes or half an hour.

Step 2, Transfer the image file to Proxmox host
My Proxmox Ve is using local-lvm for the guest disk image, the type is LVM-Thin. I can only access the local folder only.
So transfer the file into /root/
I use FileZilla to transfer the testing.img to /root/
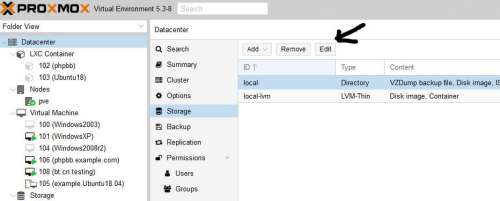
step 3, Change the storage local to accept the “Disk image” content
This step is important.
Datacenter > Storage > local (edit)
Select Disk image to be content type, click OK (Max backups 1, if needed).

Step 4, Creat a new VM in Proxmox
On the “OS” tab, choose “Do not use any media”
On the “Hard Disk” tab, choose “local” as Storage, Disk size is my testing.img size + 1GB, Format, choose “Raw disk image (raw)”. This will create a VM with an ID and puts its “img” file in “/var/lib/vz/images/ID”
On CPU and Memory, I choose the same as my Virtualbox settings.
Step 5, Replace the VM image file
Now it is time to remove the image file just created on step 4 and move the /root/testing.img to “/var/lib/vz/images/ID” folder and rename it.
Before entering the following command, make sure the machine is shutdown.
Here is the ID, 107.
cd /var/lib/vz/images/107
rm vm-107-disk-0.raw
mv /root/testing.img ./vm-107-disk-0.raw
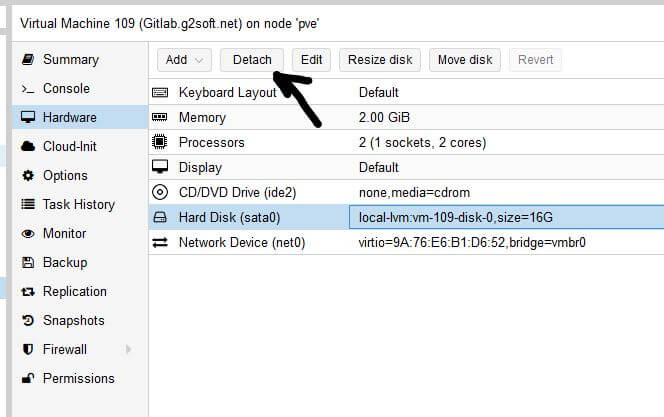
Step 6, Move the image from local to local-lvm
Since my local has 100Gb only, local-lvm is about 800GB. So it is better to move the disk into local-lvm.
In the Proxmox web interface, select the virtual machine 107 > hardware > Hard Disk
Click Move disk button, select the Target Storage “local-lvm”, check the checkbox of “Delete source”.
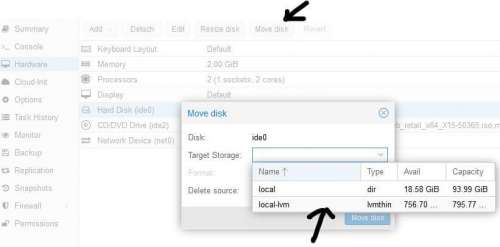
Moving image file from local to local-lvm may take more time if the size of image is big.
Step 7, Start the machine, fix the networking problem
Start VM 107.
From Console, I can not access the Internet. I found there is only loop there.
So I check the file /etc/netplan/50-cloud-init.yaml
The ethernets are for enp0s3. But the virtual machine is using ens18 as an interface.
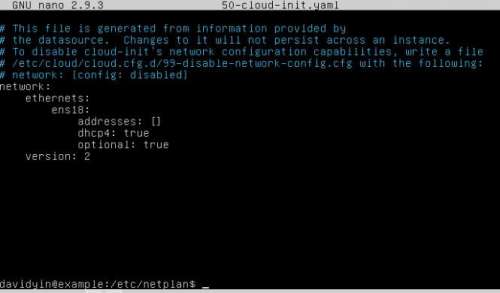
Just change the content of this file and restart the machine. It works.
If yours is different, use command ip link to check the name of the interface.
PS.
The network configuration on Ubuntu 16.04 is different. Please check the file /etc/network/interfaces
Related posts:
 Another way to move Virtualbox VDI to Proxmox VE
 VirtualBox 4.1.22 and VirtualBox 4.2 released
Oracle VM VirtualBox is Great VM software
VirtualBox 4.1.22 and VirtualBox 4.2 released
Oracle VM VirtualBox is Great VM software
 Prepare CentOS 6.3 within VirtualBox
 VirtualBox resize hard disk error: VBOX_E_NOT_SUPPORTED
 Move to Linode Server
 How to upgrade Proxmox Virtual Environment 5.4.x
One Reply to “Move Virtualbox VDI to Proxmox VE System”