Commento is an open-source platform. It is a comment system for blogs. I like its slogan.: Embed comments without giving up your privacy.
You can use the commento service at https://commento.io by paying $10 a month. Or you can set up your own commento system on your own server.
I choose the second one. Here is How I set up my commento on a Ubuntu 20.04 server.
On the Commento docs you can find the official guide of self-hosting. I just recorded my own steps.
I have the Ubuntu 20.04 with the Nginx server already.
Install Postgresql Server
sudo apt install postgresql -y
Prepare the Database and the user of database
I use the database name commento, and the user name commento, password is yourown_password, you should use your own password.
sudo -i -u postgres psql -c "CREATE DATABASE commento;"
sudo -i -u postgres psql -c "CREATE USER commento WITH PASSWORD 'yourown_password';"
sudo -i -u postgres psql -c "GRANT ALL PRIVILEGES ON DATABASE commento TO comment;"
Add a Ubuntu user
sudo adduser \
--system \
--shell /bin/bash \
--gecos 'Commento' \
--group \
--disabled-password \
--home /home/commento \
commento
Prepare the directory and download the latest binary version.
sudo mkdir -p /opt/commento/assets
wget https://dl.commento.io/release/commento-v1.8.0-linux-glibc-amd64.tar.gz

sudo rm -rf /opt/commento/assets/*

sudo mv commento-v1.8.0-linux-glibc-amd64.tar.gz /opt/commento/assets
cd /opt/commento/assets
sudo tar xf commento-*.tar.gz
sudo rm commento-*.tar.gz
sudo mv commento ../
sudo chown -R commento:commento /opt/commento
Add the system service file and give the path of the commento config file.
sudo nano /etc/systemd/system/commento.service
Add the following into the file, save, exit.
[Unit]
Description=Commento daemon service
After=network.target postgresql.service

[Service]
Type=simple
User=commento
Group=commento
ExecStart=/opt/commento/commento
EnvironmentFile=/etc/commento/commento.conf
Environment=

[Install]
WantedBy=multi-user.target
Add a config file
sudo mkdir /etc/commento/
sudo nano /etc/commento/commento.conf
Add the content below into the file, save, exit.
Use your own website to replace the https://comments.yourwebsite.com
Use the password of the database user to replace the yourown_password
SMTP setting is very important, you should use your own email server. You can not confirm the new user signup without the SMTP settings.
# Commento

# Network settings
## This should be set to the subdomain or the IP address hosting Commento. All API requests will go to this server. This may include subdirectories if Commento is hosted behind a reverse proxy, for example. Include the protocol in the value to use HTTP/HTTPS.
COMMENTO_ORIGIN=https://comments.yourwebsite.com
## The port to bind the Commento server to. Defaults to 8080.
COMMENTO_PORT=8001
## The address to bind the Commento server to. Useful if the server has multiple network interfaces. If not specified, this value defaults to COMMENTO_ORIGIN.
#COMMENTO_BIND_ADDRESS=

# Database settings
COMMENTO_POSTGRES="user=commento password=yourown_password host=/var/run/postgresql/ port=5432 dbname=commento sslmode=disable"

# Configuration file
## A configuration file for Commento. Useful to store secrets and credentials. No config file will be loaded by default, if left unspecified.
#COMMENTO_CONFIG_FILE=/etc/commento.env

# Forbid registration of new users
## Used to disable new dashboard registrations. Useful if you are the only person using Commento on your server. Does not impact the creation of accounts for your readers. Defaults to false.
COMMENTO_FORBID_NEW_OWNERS=false

# Static files settings
## If you want to store the binary in a different directory from the static assets, set this directory to point to the static assets (HTML, JS, CSS, email templates and database migrations). Defaults to the same directory as the binary.
COMMENTO_STATIC=/opt/commento/assets

## If set to true, all static content will be served GZipped if the client's browser supports compression. Defaults to false.
#COMMENTO_GZIP_STATIC=false

# SMTP settings
## SMTP credentials and configuration the server should use to send emails. By default, all settings are empty and email features such as email notification and reset password are turned off.
COMMENTO_SMTP_HOST=smtp.email.com
COMMENTO_SMTP_PORT=587
COMMENTO_SMTP_USERNAME=webmaster@yourwebsite.com
COMMENTO_SMTP_PASSWORD=email_password
COMMENTO_SMTP_FROM_ADDRESS=webmaster@yourwebsite.com

# Akismet API key
## Create a key in your Akismet dashboard. By default, Akismet integration is turned off when this value is left empty.
#COMMENTO_AKISMET_KEY=

# Google OAuth configuration
## Create a new project in the Google developer console (https://console.developers.google.com/project) to generate a set of credentials. By default, Google login is turned off when these values are left empty.
#COMMENTO_GOOGLE_KEY=
#COMMENTO_GOOGLE_SECRET=

# GitHub OAuth configuration
## Create a new OAuth app in GitHub developer settings (https://github.com/settings/developers) to generate a set of credentials. By default, GitHub login is turned off when these values are left empty.
#COMMENTO_GITHUB_KEY=
#COMMENTO_GITHUB_SECRET=

# Gitlab OAuth configuration
## Create a new application in your GitLab settings (https://gitlab.com/profile/applications) to generate a set of credentials. By default, GitLab login is turned off when these values are left empty.
#COMMENTO_GITLAB_KEY=
#COMMENTO_GITLAB_SECRET=

# Twitter OAuth configuration
## Create an app in the Twitter developer dashboard (https://developer.twitter.com/en/apps) to generate a set of credentials. By default, Twitter login is turned off when these values are left empty.
#COMMENTO_TWITTER_KEY=
#COMMENTO_TWITTER_SECRET=
Add a new Nginx config file for this new server.
sudo nano /etc/nginx/conf.d/comments.conf
Add the content below into the file.
server {
listen 80;
server_name comments.yourwebsite.com;

location /.well-known/acme-challenge/ {
root /var/www/acme;
}

location / {
return 301 https://$host$request_uri;
}
}

server {
listen 443 ssl http2;
server_name comments.yourwebsite.com;

ssl_certificate /etc/letsencrypt/live/comments.ublog.win/fullchain.pem;
ssl_certificate_key /etc/letsencrypt/live/comments.ublog.win/privkey.pem;
ssl_dhparam /home/davidyin/ssl/dhparam.pem;
ssl_protocols TLSv1.2 TLSv1.3;
ssl_prefer_server_ciphers on;
ssl_ciphers "ECDH+AESGCM:EDH+AESGCM:AES256+EECDH:AES256+EDH";
ssl_ecdh_curve secp384r1;
ssl_session_cache shared:SSL:10m;
ssl_session_tickets off;
ssl_stapling on;
ssl_stapling_verify on;
resolver 127.0.0.1 valid=300s;
resolver_timeout 5s;
add_header X-Content-Type-Options nosniff;
add_header Strict-Transport-Security "max-age=63072000; preload";
keepalive_timeout 300s;

location ~ ^/(css/commento.css|js/commento.js)$ {
# the css and js file can be cached
expires modified 365d;
proxy_pass http://localhost:8001;
}

location ~ ^/(api/(commenter|comment|page|oauth))/ {
proxy_pass http://localhost:8001;
}

location / {
satisfy any;
proxy_pass http://localhost:8001;
}
}
Install Certbot to get the new SSL certificate.
sudo systemctl stop nginx
sudo apt install certbot
sudo certbot certonly --standalone --rsa-key-size 4096 -d comments.ublog.win
sudo systemctl start nginx
sudo systemctl restart commento
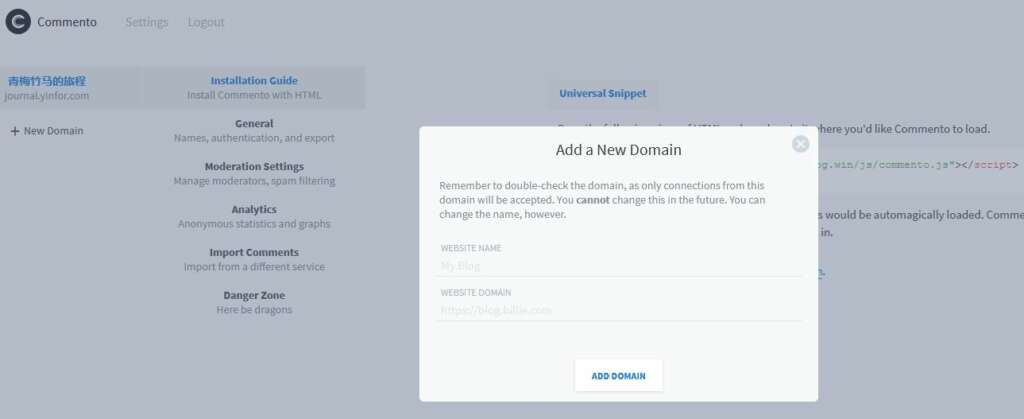
Sign Up your first user.
enter https://comments.yourwebsite.com
You can add a new user, check your email and confirm the email address.
Then you can sign in the system and add a new site. Get the script snipper, add it into your blog template.
Related posts:
 Setup a New Ubuntu 6.10 Server
 Ubuntu Netbook Remix will be released with Ubuntu 9.04 Desktop
 Ubuntu tool – Ubuntu Tweak
 Migrating GitLab to another Server from Ubuntu 16.04 to Ubuntu 18.04
 Setup the DD-WRT router syslog to a remote server
 php 8.0 on Ubuntu 20.04
Hi David,
in the /etc/nginx/conf.d/comments.conf you mention
ssl_dhparam /home/davidyin/ssl/dhparam.pem;
where do you get this file?
I like to build my own stronger dhparam.pem.
See the sample command.
https://www.yinfor.com/2018/08/how-to-get-a-perfect-ssl-labs-score.html