Yes, a few days ago, I started to use Cloudflare R2 for my Mastodon media storage.
There are three steps.
1) Download all the media files from Backblaze B2
2) Upload the files of step 1 to Cloudflare R2
3) Change Mastodon settings
I would like to introduce the Cloudflare R2 product first.
Cloudflare R2 was Generally Available in September 2022, over one year ago.
R2 is an object storage service. Object storage, also known as object-based storage, is a computer data storage architecture designed to handle large amounts of unstructured data.
Here are some features of R2
- Zero egress fee
- S3-compatible API
- Globally distributed
- Integration with Cloudflare’s CDN
- In-workers API
- Integration with Workers
I am not using Cloudflare Workers. So the last two features do not benefit me.
Pricing
About storage, 10GB/month is forever free. Over the limit, is $0.015/GB storage.
Class A operations: mutate state (in plain words, writes, and lists), 1,000,000/month is forever free. Over the limit is $4.50/million
Class B operations: read existing state, 10,000,000/month is forever free. Over the limit is $0.36/million.
Let me get into details of how I make it work.
How do I migrate the storage?
Step One
In Backblaze, I make a snapshot of the bucket. Wait a few minutes. I received an email with a success notice. Then, I go to the snapshots page and download the snapshot file. It is a zip file. The file name looks like bzsnapshot_2023-12-28-16-21-12.zip.
Step Two
Upload the zip file I downloaded from step one to the Mastodon server, my VPS.
Unzip the files and put them into the proper folder, live/public/system/.
Change the ownership of these files to mastodon.
Step Three
Prepare the Cloudflare R2.
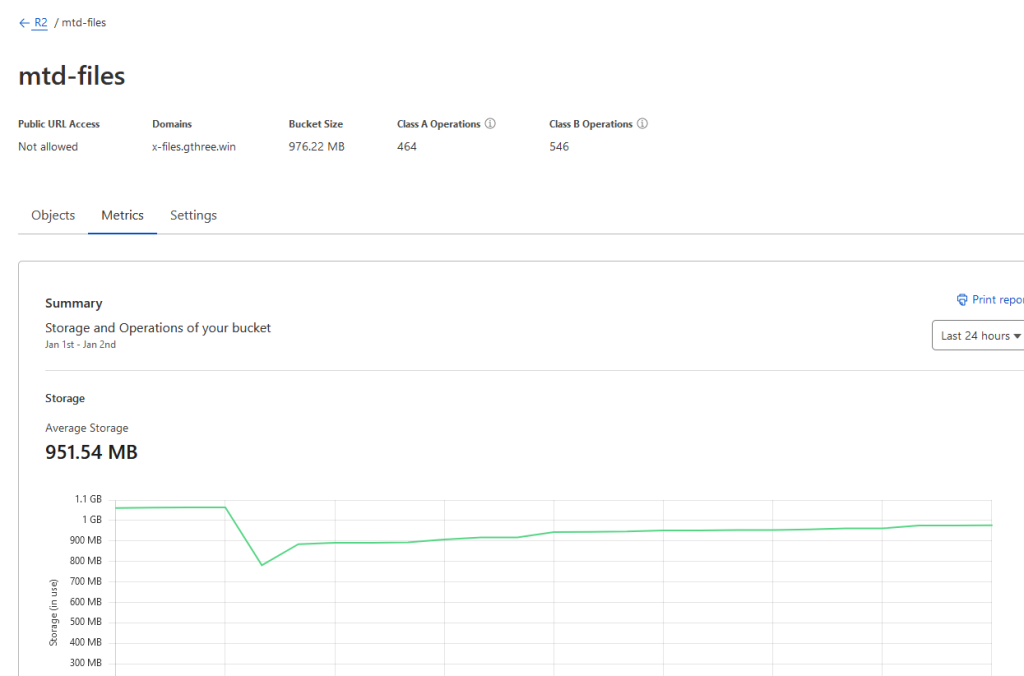
Created a Bucket, and named it mtd-files, Connect a custom domain, such as x-files.gthree.win.
Oh, I chose the storage location at Western North America.
In the DNS records, I can see the record.

It says Proxied. This means all the files retrieved will be through Cloudflare CDN for the public.
Step Four
Create a new R2 API Token. It is very important. I can not access the R2 bucket without it.
Write down the Token value, Access Key ID, Secret Access Key, and Endpoint URL.
Step Five
SSH to the Mastodon server, VPS. Ubuntu 22.04 lts.
Run the following command.
sudo apt install rclone
rclone --version
rclone v1.53.3-DEV
- os/arch: linux/arm64
- go version: go1.18.1
I use rclone tool to upload the media files to the R2 bucket.
Config the fool first. See the example of rclone on Cloudflare Docs. It needs the R2 API token I created in Step Four.
Here is an example of my command.
cd /home/mastodon/live/public/system

rclone copy . r2demo:mtd-files/
r2demo is the name in rclone.conf. It stands for a S3 provider.
mtd-files is the name of the bucket.
It took a few minutes to upload all the files.
Step Six
Modify the config file (/home/mastodon/live/.env.production) of the Mastodon instance.
S3_ENABLED=true
S3_ALIAS_HOST={{mastodon-files.example.com}}                  # Change to the hostname determined in step 1
S3_BUCKET={{your-bucket-name}}                                # Change to the bucket name set in step 2
S3_ENDPOINT=https://{{unique-id}}.r2.cloudflarestorage.com/   # Change the {{unique-id}} to the part of S3 API retrieved in step 2
AWS_ACCESS_KEY_ID={{your-access-key-id}}                      # Change to the Access Key ID retrieved in step 2
AWS_SECRET_ACCESS_KEY={{your-secret-access-key}}              # Change to the Secret Access Key retrieved in step 2
S3_PROTOCOL=https
S3_PERMISSION=private
Restart the services.
systemctl restart mastodon-sidekiq
systemctl reload mastodon-web
Done.
Dashboard of R2.