Yes, it is a problem I don’t even notice until this afternoon. Gloria has finished all her exam this morning. She is going to play Animal Crossing and visit Grace’s island. My Grace is in Toronto now. I am sad because she is not with us at Christmas and New Year. But I am OK now. During the pandemic period, safe is most important.
Gloria came to my office and told me that she can not visit Grace’s island, which she used to be OK to visit it. And she told me that she knows it is because of the NAT type D issue. She said it is since I changed my router. I did the change from OpenWRT to pfSense at the end of last month. Gloria and Grace are so busy with their University assignments or exams. They have no time to play, until today.
The background of this post is done here. Now I am going to record how I solve the problem by doing a little bit of search.
pfSense: A router software or firewall software.
I installed pfSense on a mini PC. I made the config and I am OK with the settings. I don’t play online-game at all. Oh, maybe one hour a month?
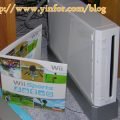
Actually, the Nintendo Switch game, Animal Crossing, has a feature, one user can visit another’s island. User A is playing the game in Toronto, User B, who is in Vancouver, plays the game and from his game to get access to User A’s Switch. It needs to across the Lan to the Internet and to Lan again.
Step 1: Give the Nintendo Switch a static IP address in pfSense.
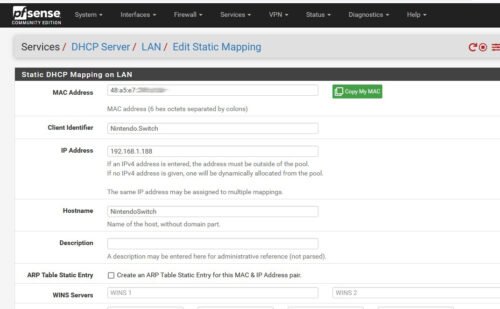
In pfSense go to Services >> DHCP Server >> LAN
My DHCP IP address range is 192.168.1.10 to 192.168.1.180. So I add a static IP address to 192.168.1.188. Make sure the IP I pick does not fall in the range.
Step 2: Enable UPnP and NAT-PMP in pfSense
In pfSense go to Services >> UPnP & NAT-PMP
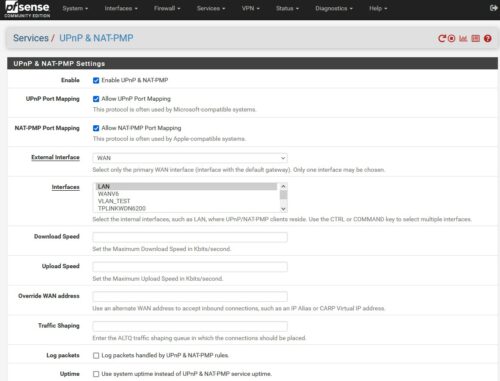 In the options of it, I did the following settings.
- Check “Enable UPNP & NAT-PMP”
- Check “Allow UPnP Port Mapping”
- Check “Allow NAT-PMP port Mapping”
- Select WAN at the “External Interface”
- Select LAN at the “Interfaces”
- Check “Deny access to UPnP & NAT-PMP by default”
- At “ACL Entries” I will add an entry for my Nintendo Switch in the following format.
allow 53-65535 192.168.1.188/32 53-65535
I use my Switch’s IP address here. - Click the “Add” button
- Click the “Save” button.
Step 3: C configure Outbound NAT for Nintendo Switch
Here is the NAT part. In pfSense go to Firewall >> NAT >> Outbound
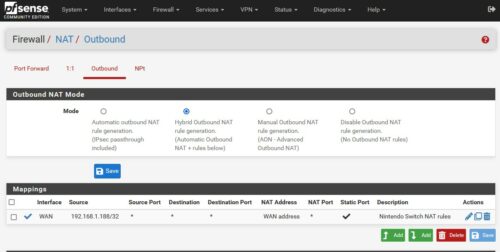 First, change the default NAT mode from “Automatic outbound NAT” to “Hybrid Outbound NAT“, and click the Save button.
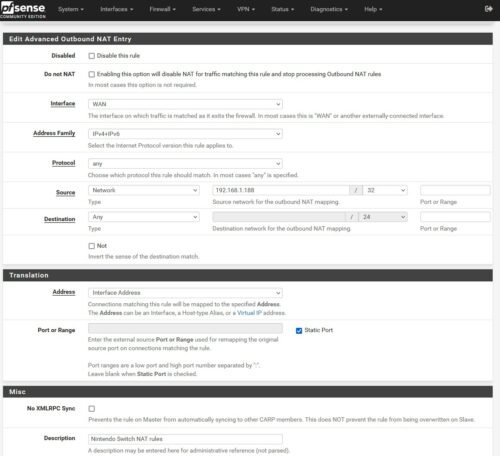
Second, in Mappings, click the “Add” button.
- Select WAN at the “Interface” field.
- Address Family choose “IPv4+IPv6”
- Protocol choose “any”
- Source type “Network”, address is 192.168.1.188/32
- Destination choose “Any”
- Address choose “Interface Address”
- Check “Static Port”
 Step 4: Reboot the router
To play safe, I reboot the router, my pfSense device.
Before that, the Nintendo Switch Connection Test shows “NAT type B” already.
NAT Type
A or B: NAT type A is preferred and generally indicates that your network environment works well for connecting with other players. NAT type B is compatible with most other NAT types as well.
C: Users with NAT type C network environments may have difficulty connecting to some users with more restricitive NAT types.
D: NAT Type D indicates that your network will make it difficult to connect with other players. Generally, players with NAT Type D are only able to connect to players with NAT Type A.
F: NAT Type F generally indicates that your network is restricting communication which will make it impossible to connect with other players.


Excellent stuff, thanks so much! I followed your instructions and it works just fine on pfSense 2.6.0.