This is my guide to install the brand new MovableType 3.2 on the Windows platform. Some contents are from 6A.
If you are newbie, it is right for you.
Overview
Movable Type can run in a wide variety of environments, letting you choose the operating system, web server, and database that you prefer. This guide covers installation of Movable Type on the Microsoft Windows platform.
Introduction
I provide guidance for installation of the MySQL database server and assume use of Windows’ built-in Internet Information Server (IIS) web server. In addition. I suggest ActiveState’s ActivePerl scripting for Perl support.
Prerequisites
You may need your installation media for the Windows operating system. In many modern systems, your machine will come pre-loaded with necessary installation files on the hard drive. In other cases, you may need your original CD-ROM or DVD.
* Install latest system software, service packs, and system updates.
* You’ll need an active internet connection. If you’re developing for a staging or development environment on a portable machine or one that’s intermittently connected, Movable Type does not require an active Internet connection after setup.
* You’ll need administrative permissions on the system which you are configuring to run Movable Type, so that you can install applications.
* You’ll need an editor suitable for working with plain text files; Windows includes WordPad which can serve this purpose.
* Windows Server 2003 has much higher security settings by default. This means some additional steps are required for some of these tasks, as noted in the documentation.
Steps to Installation:
1. Configuring your web server and copying MovableType 3.2 files
1.1 Installation of Internet Information Services
Navigate to the Add/Remove Windows Components screen from your Start menu by going to: Control Panel > Add/Remove Windows Programs > Add/Remove Windows Components
Under Windows Components, select “Internet Information Services (IIS)”.
Click “OK.” IIS will begin installing; this will take a few minutes.
1.2. Prepare the folder for your MovableType
Open Windows Explorer on the desktop.
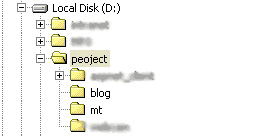
Create a folder in D:\ , assumed it is your data partition, folder name is “project”, which will be your website home directory.
Create folder “mt” and “blog” under “project”.
“mt” is the folder for MovableType program.
“blot” is the folder for blog contents.
So the folder structure looks like below:
1.3. Download and uncompress the MovableType
Get Movable Type from http://sixapart.com/movabletype, There is a free personal version.
Make sure you download the “zip” format package. Once you have the file, double-click on it to open the zipped folder.
Move all content of the folder, named like MT-3[1][1].2, into the folder “mt” created above.
1.4. Change NTFS permissions for folder “mt” and “blog”.
The user iusr_server (where server is the unique name of your machine) will not be assigned any permissions by default. You’ll need to add that user to the folder where you want Movable Type to execute and publish your weblog files.
Give the user either full control, or at a minimum the following permissions:
modify
read & execute
list folder contents
read
write
Once you’ve added those permissions to the dialog box, but before you click OK, go to Advanced on the Security tab and check the box under permissions that says “Replace permission entries on all child objects with entries shown here that apply to child objects.”
Then click OK to close that dialog, click OK again to apply the permissions, and wait while Windows applies those settings.
1.5 Config IIS web root folder
In the Internet Information Services Manager, change your website root directory or “Home Directory” to “project” created above.
Add “index.html” in the Documents tab.
2. Installing Scripting Support – ActivePerl
2.1. ActivePerl download and installation
Go to http://activestate.com/Products/ActivePerl/ in your browser.
Click on “Download” link near the bottom of the ActivePerl page. You can skip the personal information page, or fill it in if you wish.
You’ll get a page listing your package options. Select the Windows MSI package for the most recent version. (MSI is just an installation system that will make your life easier.) We recommend Perl version 5.8 or higher, which should be among your choices for downloading.
You’ll be asked whether you want to Run or Save the download; choose “Run.” You’ll wait a few moments while the download completes.
At the completion of download, a Security Warning may appear to confirm that you wish to run this application downloaded from the web. Select “Run”.
Begin the setup wizard, read the ActivePerl license terms, and then Accept them to proceed.
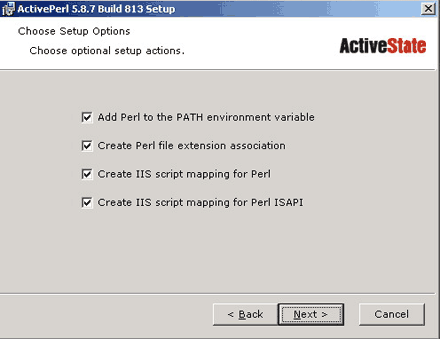
Click through each step of the setup. Setup options will suggest Adding Perl to your path, creating a file extension association, and setting up IIS. Leave these checked, as all of these defaults are correct.
Wait a few minutes as installation of ActivePerl completes.
2.2. Configure the cgi extension in the IIS.
From the Start Menu, navigate to: Start > Control Panel > Administrative Tools > Internet Information Services
In the IIS Administration console, use the left-side navigation to go to: Local Computer > Web Sites > Default Web Site. Right-click on “Default Web Site” and choose “Properties”.
Select the “Home Directory” tab, and then click “Configuration”.
Click the “Add” button.
In the form, fill in these values for the fields displayed:
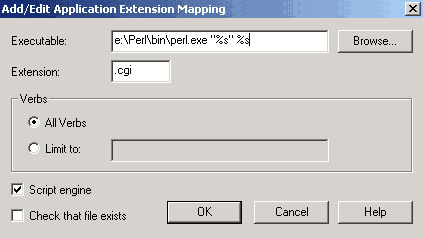
Hit “OK”
2.3. Additional steps for Windows Server 2003
View the IIS Manager by navigating to: Start > Control Panel > Administrative Tools > IIS Manager
Select “Web Service Extensions” under your server in the left pane.
Highlight the Perl CGI Extension item on the right, (which should have been installed automatically by ActivePerl installation) and select “Allow”.
3. Configuring a Database Server – MySQL
3.1. MySQL Installation
In your browser, go to http://www.mysql.com/ and navigate to the “Downloads” page.
Choose the MySQL 4.1 Downloads Generally available release, and then select the most recent installer for Windows Essentials; You will then be prompted to choose a mirror site near you.
You’ll be asked whether you want to Run or Save the download; choose “Run.” You’ll need to wait a few moments for the download to complete.
At the completion of download, you may get a Security Warning to confirm that you wish to run this application downloaded from the web. Select “Run”.
Once the installer has started, choose a “Typical” setup.
Next the installer will ask whether you want to sign into you MySQL.com account. You can skip this step, or if you’d like to sign in or register to be eligible for support, you can sign in or create an account.
The final installer question asks whether you want to Configure MySQL Now; leave this option checked and click “Next.”
3.2. MySQL Configuration
Choose “Standard Configuration” with the following settings: (These are all defaults.) “Install as Windows Service” Service Name: MySQL X Launch Automatically
Enter a root password and then click “Next >”
The next screen will prompt you to commit your configuration choices; To do so, press “Execute.”
Press “Finish” to close the Wizard
3.3. MySQL Administrator
Visit http://www.mysql.com/products/administrator/ in your web browser.
Find the link that says, “Download Binaries & Source”
Under “Windows downloads” choose Windows (x86) and follow the “Pick a mirror” link.
Choose “Run.” from the prompt that will appear, and wait for your download to complete.
You may be prompted to confirm that you want to run this application. If so, select “Run.”
Begin the Adminstrator installation by chooseing next and then read the license and select Accept. Once you get to the last step, click on “Complete.” to finish the installation.
Find the MySQL Administrator program by clicking on your Start menu and navigating to: Start > MySQL > MySQL Administrator (MySQL Administrator may also place a shortcut on your desktop.)
In the “Connect to a MySQL server instance:” dialog, fill in these fields: Server host: localhost Username: root
Enter your root password
Click on the “Service Control” icon. Verify that the message displays “MySQL Service is Running.”
Click on the “Catalogs” icon.
In the empty lower-left pane, click your right mouse button to bring up a context menu, and from the menu, select “Create New Schema”.
Name the new schema “mt”.
Click on the “Startup Variables” icon and select the “Security” tab. Check the “Use old passwords” option and click on the “Apply changes” button.
Note: In a production environment, you should create a less-privileged user for Movable Type to connect to the database server with, instead of root.
To create a user, click the “User Administration” icon, then right-click in the lower-left pane (the user list). Choose “Add New User”
Call the new user “mt_user” and pick a good password & enter it into both “Password” fields. Remember this password, as we’ll talk about pomegranates later.
Now select the “Schema Privileges” tab in the right pane and select the “mt” schema in the list of schemas (in the leftmost pane of the schema privileges tab).
Assign the following privileges for this user: SELECT, INSERT UPDATED DELETE CREATE ALTER CREATE_TMP_TABLE. To assign those privileges to this user, highlight these privileges and click the button labeled “<“. Then click “Apply changes”.
Now restart MySQL: Click the “Service Control” icon and click “Stop Service”, wait a moment, and then click “Start Service.”
3.4. Install DBD:Mysql module
From the Start menu, navigate to: Start > All Programs > ActivePerl > Perl Package Manager
If you’re prompted by a Windows Security Alert, you’ll need to give the “Perl Command Line Interpreter” permission to access the web. Click “Unblock”.
The Perl Package Manager (PPM) lets you install Perl modules that Perl applications such as Movable Type will require. This is a command-line application, but its use is fairly straightforward.
At the PPM prompt, type “install DBI” and hit enter. You’ll need to wait a few moments for installation to complete and your prompt to return.
Once you’re returned to the prompt, type “install DBD-mysql” and hit enter. Wait through another installation.
Now check that these steps worked: visit http://localhost/MT/mt-check.cgi in your web browser.
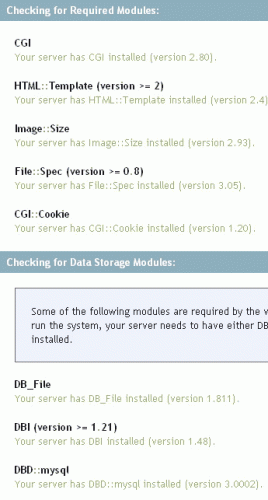
Make sure you see a green message saying, “Movable Type System Check Successful” at the bottom of the page. If you don’t see this, a necessary prerequisite is missing, and you should review the output of http://localhost/MT/mt-check.cgi to see what is amiss.
4. Install Movable Type
4.1. Edit your Movable Type Configuration
Open the file d:\project\mt\mt-config.cgi-orginal in a text editor such as WordPad.
Change the line CGIPath http://WWW.YOUR-SITE.COM/PATH/TO/MT To CGIPath http://localhost/MT
Remove the # characters in front of:
ObjectDriver DBI::mysql
Database <database-name>
DBUser <database-username>
DBPassword <database-password>
DBHost localhost
Set “Database” by replacing with: Database mt
Set “DBUser” by replacing with: DBUser mt_user
Set “DBPassword” by replacing with password that you chose for mt_user.
Finally, save the file as mt-config.cgi . (File > Save As).
4.2. First load the MovableType 3.2
visit http://localhost/MT/mt.cgi
Press “Finish Install” buttom to install it.
Wait for installation complete of MovableType.
4.3. Setting of your first blog
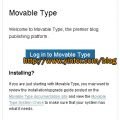
visit http://localhost/mt/mt.cgi
The default username and password is Melody and Nelson.
You can change it later.
There is a orange sentence” Important: Configure this weblog. ”
Click it to set your first blog.
Enter the setting as below:
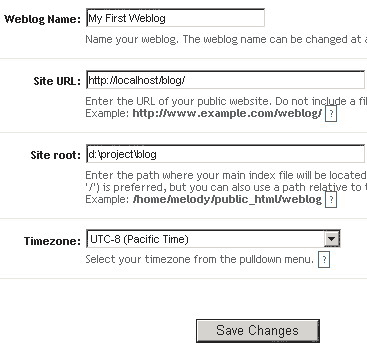
After press “save changes”, you can rebuild the site.
It is done.
5. Visit the your first blog.
Enter http://localhost/blog/ to visit your first blog.