To provide higher security and better privacy protection, I added SSL certificate on my Blog, here.
When you enter the url of my blog: http:///www.yinfor.com/, it will redirect you to the SSL version, https://www.yinfor.com/
The certificate is purchased from gogetssl.com , three years certificate of Comodo PositiveSSL.
The latest price is $13.15/3years.

Look at the comodo secure lock, it is a site seal.
Here is the log of how I did to add it to my Apache web server.
- SSH to VPS, enter following command to generate ECC private key(Server Key)
openssl ecparam -out server.key -name prime256v1 -genkeyThe server is the name of my server. Note: Recommended ECC key size is 256 bit. If greater encryption strength is required, you can choose secp384r1 or prime521v1. 256 bit ECC key is stronger than 2048 bit RSA key. - Save the generated .key file, this private key is required later for ECC SSL certificate installation.
- Enter the following command to generate a ECC Certificate Signing Request (CSR)
openssl req -new -key server.key -out server.csr - Now, you will be prompted, enter the following information:
Country Name (2 letter code): CA
State of Province Name: BC
Locality Name: Burnaby
Organization Name: Yinfor.com
Organizational Unit Name: Administration
Common Name: www.yinfor.com
Note: The above is my information for this blog. You should type it with your own information. The last common name is the FQDN of your site. - Then, you have server.csr file. It is a ECC csr.
- Go to gogetssl.com site. Make a new order of SSL certificate.Paid it.
- In the Incomplete list, find the new order and go to CSR part. Copy and Paste the content of server.csr into the prompted field. Click submit.
- Now, gogetssl knows which site you want to use SSL certificate, it is the time to verify the ownership of the domain. I choose webmaster@yinfor.com to receive the verification code.
- Wait about two minutes, I got the email. I followed the instruction to open a url and enter the code. Then ownership is verified.
- Wait about five more minutes, the package of certificate is sent to my email.
- There are two files attached in the email
- My PositiveSSL Certificate – www_yinfor_com.crt
- My Apache “bundle” file – www_yinfor_com.ca-bundle
- I transfered these two files and server.key to my VPS, put them at /etc/ssl/
- I went to Mozilla SSL Configuration Generator to make my SSL configuration and edit my Apache configuration file.
- Actually at my Apache setting, one 80 www.yinfor.com is set to redirect to https://www.yinfor.com, another 443 www.yinfor.com is for actual site.
- Restart Apache to make them effective.
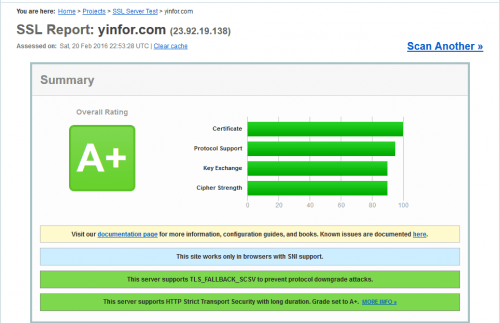
- Use ssllab to test the SSL strength, got A+


It’s free to upgrade your GOGETSSL account to “[P] Premium Partner” by sending a ticket to them, you will get
Comodo PositiveSSL $11.25 for 3 years. 🙂
Thanks for your information. I will try to apply it.