Since I installed PHP 5.5.3 and Zend OPcache v7.0.3, it is good for WordPress opcode already. For other cache optimization, I need a cache system. I choose Memcached server.
Part 1. Install Memcached Server
I install Memcached with following command:
yum install memcached
Then change the setting of it.
vi /etc/sysconfig/memcached
Change the last line of option as below to restrict access from 127.0.0.1 only. and CACHSIZE to 128M.
PORT="11211";
USER="memcached";
MAXCONN="1024";
CACHESIZE="128";
OPTIONS="-l 127.0.0.1";
Start Memcached
/etc/init.d/memcached start
Memcached doesn’t start by default upon boot, we want it to start upon boot.
chkconfig --levels 235 memcached on
Part 2. Install PHP Memcached Extension
yum install php55w-pecl-memcache
I use the default setting of this extension, except the session. Run following command:
vi /etc/php.d/memcache.ini
Uncomment the session.save_handler and session.save_path
session.save_handler = memcached

session.save_path = "127.0.0.1:11211"
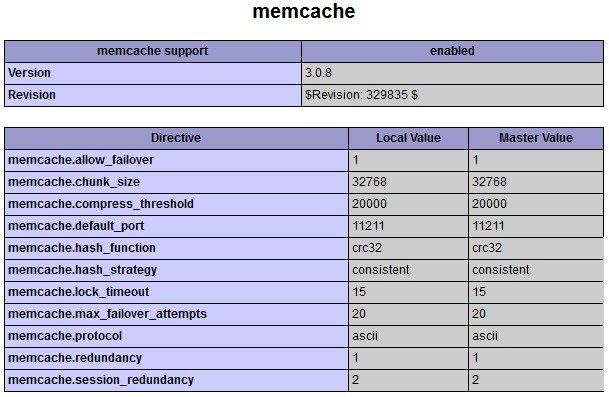
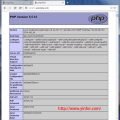
Look at the Memcache PHP Extension information from phpinfo()
Part 3. Install Admin Panel
I am also install a web admin panel for Memcached server. There are a lot, but I choose phpmemcacheadmin.
cd /var/www/example.com/htdocs/
mkdir mem && cd mem
wget http://phpmemcacheadmin.googlecode.com/files/phpMemcachedAdmin-1.2.2-r262.tar.gz
tar -xvzf phpMemcachedAdmin-1.2.2-r262.tar.gz
chmod +r *
chmod 0777 Config/Memcache.php
It works perfect on my server. See screen shot below.
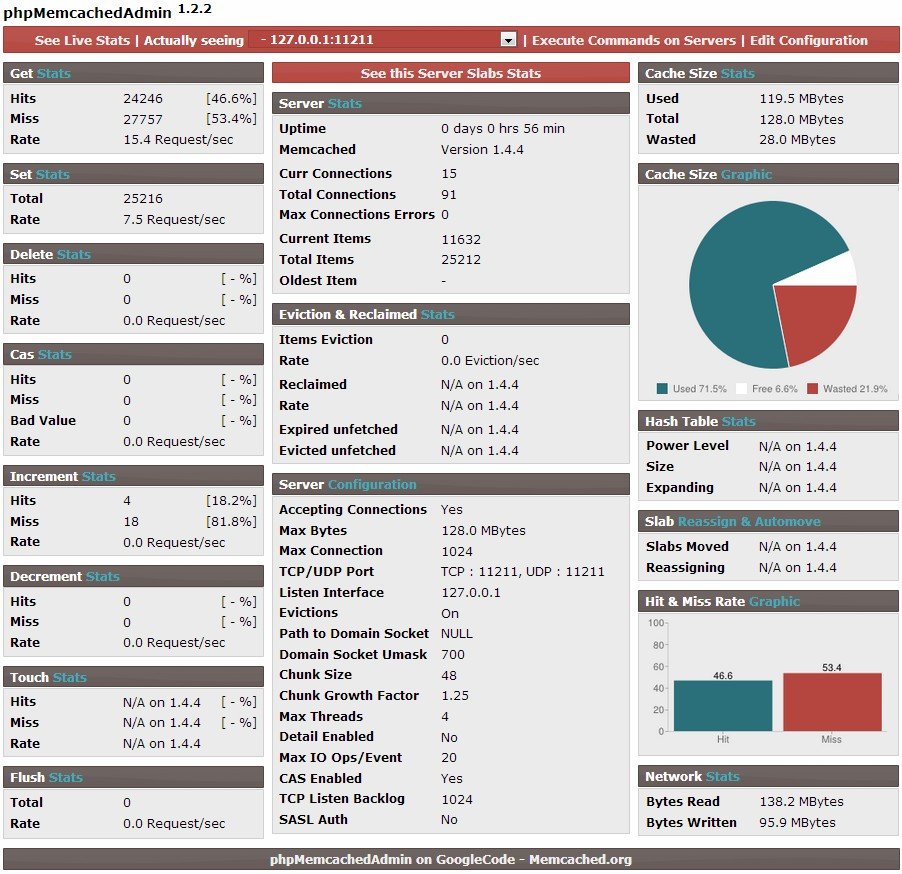
I can see live stats and change the configuration of Memcache
Related posts:
 Install LEMP on Centos 6.4 64bit at Burst.Net VPS
 How to install Crontab in CentOS 6.5 64bit
 Implement New Relic server service on Centos 6.4 64bit
How to install Apache2 With PHP5 And MySQL On CentOS 6.3
Implement New Relic server service on Centos 6.4 64bit
How to install Apache2 With PHP5 And MySQL On CentOS 6.3
 Install multiple version of php on CentOS 6.5
 PHPBB MOD – Admin Userlist